Table of Contents
Kotlin 1.2.0 + Spring で Web Application を作る (1 of 4) の続きです。
Web Page を作る
Task (作業) の登録・一覧表示ができるようにします。
下準備
kotlinx.html, PostgreSQL を使用するために、 build.gradle を更新します。
|
1 2 3 4 5 6 7 8 9 10 11 12 13 14 15 16 17 18 19 20 21 22 23 24 25 26 27 28 29 30 31 32 33 34 35 36 37 38 39 40 41 42 43 44 45 |
buildscript { ext.kotlin_version = '1.2.0' repositories { mavenCentral() } dependencies { classpath "org.jetbrains.kotlin:kotlin-gradle-plugin:$kotlin_version" } } // 追加 plugins { id 'org.springframework.boot' version '1.5.8.RELEASE' } // 記述場所変更 group 'com.example' version '1.0-SNAPSHOT' apply plugin: 'kotlin' repositories { mavenCentral() jcenter() } dependencies { compile("org.jetbrains.kotlin:kotlin-stdlib-jre8:$kotlin_version") compile("org.springframework.boot:spring-boot-starter-web:1.5.8.RELEASE") // 追加 compile("org.springframework.boot:spring-boot-starter-data-jpa") compile("org.postgresql:postgresql:42.1.4") def kotlinx_html_version = "0.6.6" compile("org.jetbrains.kotlinx:kotlinx-html-jvm:${kotlinx_html_version}") } compileKotlin { kotlinOptions.jvmTarget = "1.8" } compileTestKotlin { kotlinOptions.jvmTarget = "1.8" } |
データベースの接続設定も必要ですので、 resources/application.properties を作成します。
|
1 2 3 4 5 6 7 8 9 10 |
server.address=0.0.0.0 spring.datasource.driverClassName=org.postgresql.Driver spring.datasource.testOnBorrow=true spring.datasource.validationQuery=SELECT 1 # Database Setting spring.datasource.url=jdbc:postgresql://localhost/example spring.datasource.username=developer spring.datasource.password=developer |
そして、今回使用するテーブルを SQL で作成しておきます。
|
1 2 3 4 5 6 |
CREATE TABLE task( id SERIAL PRIMARY KEY, name VARCHAR, created_at TIMESTAMP, updated_at TIMESTAMP ); |
Entity 作成
Spring の Entity とリポジトリクラスを作ります。 Kotlin らしく Getter, Setter は作りません。
|
1 2 3 4 5 6 7 8 |
src - main - kotlin - com.example.myapp - domain - task |- Task.kt <- 追加するクラス - TaskRepository.kt <-追加するインターフェース |
|
1 2 3 4 5 6 7 8 9 10 11 12 13 14 15 16 17 18 19 20 21 22 23 24 25 26 27 28 29 30 31 32 33 34 35 |
package com.example.myapp.domain.task import org.springframework.data.annotation.CreatedDate import org.springframework.data.annotation.LastModifiedDate import org.springframework.data.jpa.domain.support.AuditingEntityListener import java.util.* import javax.persistence.* @Entity @EntityListeners(AuditingEntityListener::class) class Task { @Id @SequenceGenerator( name = "task_id_seq", sequenceName = "task_id_seq", allocationSize = 1 ) @GeneratedValue( strategy = GenerationType.SEQUENCE, generator = "task_id_seq" ) var id: Long? = null var name: String? = null @CreatedDate @Temporal(TemporalType.TIMESTAMP) @Column(nullable = false, updatable = false) var createdAt: Date? = null @LastModifiedDate @Temporal(TemporalType.TIMESTAMP) @Column(nullable = false, updatable = false) var updatedAt: Date? = null } |
データベースからデータを取得するため、 Repositoryインターフェースも作っておきます。
|
1 2 3 4 5 |
package com.example.myapp.domain.task import org.springframework.data.jpa.repository.JpaRepository interface TaskRepository: JpaRepository<Task, Long> |
Entity で @CreatedDate, @LastModifiedDate を使用しますので、Application クラス に @EnableJpaAuditing を付け加えておきます。
View 作成
View 部分を作ります。 共通レイアウトと内部のコンテンツに分けて、オブジェクトとして作ります。
|
1 2 3 4 5 6 7 8 9 |
src - main - kotlin - com.example.myapp |- presentation |- layout | - LayoutView.kt - task -TaskView.kt |
まず共通レイアウトを LayoutView に記述します。
|
1 2 3 4 5 6 7 8 9 10 11 12 13 14 15 16 17 18 19 20 21 22 23 24 25 26 27 28 29 30 31 32 33 34 35 36 37 38 39 40 41 42 43 44 45 46 47 48 49 50 51 52 53 54 55 56 57 58 59 60 61 |
package com.example.myapp.presentation.layout import com.example.myapp.presentation.core.col import com.example.myapp.presentation.core.row import kotlinx.html.* import kotlinx.html.stream.appendHTML import org.springframework.ui.ModelMap import java.io.StringWriter object LayoutView { private fun HEAD.metaTags() = { meta { attributes["charset"] = "UTF-8" } meta(name = "robots", content = "noindex,nofollow,noarchive") meta(name = "viewport", content = "width=device-width,initial-scale=1.0") }() fun default( modelMap: ModelMap, pageTitle: String = "", block: DIV.() -> Unit ): String = StringWriter(). appendln("<!DOCTYPE html>"). appendHTML().html { head { title { +pageTitle } metaTags() styleLink("https://maxcdn.bootstrapcdn.com/bootstrap/4.0.0-beta.2/css/bootstrap.min.css") } body { id = "main" header("pos-f-t") { nav("navbar navbar-light bg-light") { a("/") { classes = setOf("navbar-brand") +"Task List" } } } if (modelMap.containsAttribute("success")) { div("container") { row { col { div("alert alert-success") { role = "alert" +(modelMap["success"] as String) } } } } } div("container") { block() } } }.toString() } |
default メソッド がレイアウトの構造を表しています。 Kotlin で書いているので、 タグの閉じ忘れはエディタが教えてくれますし、 分岐の if, when は Kotlin と同じ文法で書くことができます。 ここではスタイルシートとして bootstrap を header タグ に入れています。 metaタグ を別のファンクション(metaTags)としてまとめています。
Task を一覧表示する View を作ります。
|
1 2 3 4 5 6 7 8 9 10 11 12 13 14 15 16 17 18 19 20 21 22 23 24 25 26 27 28 29 30 31 32 33 34 35 36 37 38 39 40 41 42 43 44 |
package com.example.myapp.presentation.task import com.example.myapp.domain.task.Task import com.example.myapp.presentation.layout.LayoutView import kotlinx.html.* import org.springframework.ui.ModelMap object TaskView { fun list( modelMap: ModelMap, taskList: List<Task> ) = LayoutView.default(modelMap) { taskList.forEach { div("row") { div("col") { +it.name.orEmpty() } } } hr { } div("row") { div("col") { postForm("/task") { div("form-group") { label("col-form-label") { htmlFor = "name" } textInput { classes = setOf("form-control") name = "name" } } div("form-group") { button { classes = setOf("btn btn-primary") type = ButtonType.submit +"Submit" } } } } } } } |
Taskの一覧と、Taskを追加するフォームのみ表示しています。 これで View は完成です。
メソッド orEmpty は 型 String? に用意されているメソッドで、 値が null の場合に 空文字列(“”)を返すものです。 次のように書くこともできます。
|
1 |
stringValue ?: "" |
kotlinx.html では、 HTMLタグと同じ名前のファンクションが用意されています。 それらは Higher-Order Function (高階関数) で、最後の引数が関数になっています。 多くはラムダを使い、そのラムダの中でタグの属性を設定します。 ほとんどの属性は 属性 = 文字列 の形で設定できるようになっていますが、 予め用意されていない属性や data-xxx のような独自の属性を設定するときは attributes を使用します。 また、多くのタグで、 div("form-group") のようにタグの引数(ここでは "form-group")を利用してCSSクラスを設定できます。
|
1 2 3 4 |
// 独自の属性設定 div { attributes["data-id"] = "a" } |
kotlinx.html には div のようにタグ名そのままのファンクションだけでなく、 postForm や textInput のように少しカスタマイズされたファンクションも用意されています。
Spring Security の CSRFトークンを form に加えたり、 DELETE, PATCH などのリクエストを送信する場合は次のようにします。
|
1 2 3 4 5 6 7 8 9 10 11 12 |
import org.springframework.security.web.csrf.HttpSessionCsrfTokenRepository // request は HttpServletRequest のオブジェクト val csrfToken = HttpSessionCsrfTokenRepository().generateToken(request) hiddenInput(name = csrfToken.parameterName) { value = csrfToken.token } // Spring での DELETE リクエストに使用するタグ // ラムダですべての属性を設定する書き方 hiddenInput { name = "_method" value = "DELETE" } |
コントローラ作成
追加と表示のみを考えます。
|
1 2 3 4 5 6 7 8 9 10 11 12 13 14 15 16 17 18 19 20 21 22 23 24 25 26 27 28 29 30 31 32 33 34 35 36 37 38 39 |
package com.example.myapp.presentation.task import com.example.myapp.domain.task.Task import com.example.myapp.domain.task.TaskRepository import org.springframework.beans.factory.annotation.Autowired import org.springframework.stereotype.Controller import org.springframework.ui.ModelMap import org.springframework.web.bind.annotation.* import org.springframework.web.servlet.mvc.support.RedirectAttributes @Controller @RequestMapping("task") class TaskController { @Autowired private lateinit var taskRepository: TaskRepository @ResponseBody @GetMapping fun list(modelMap: ModelMap): String { return TaskView.list(modelMap, taskRepository.findAll()) } @ResponseBody @GetMapping(produces = arrayOf("application/json")) fun listJson(): Map<String, Any?> { return TaskJsonView.list(taskRepository.findAll()) } @PostMapping fun create( attributes: RedirectAttributes, @RequestParam name: String): String { val task = Task() task.name = name taskRepository.save(task) attributes.addFlashAttribute("success", "タスクを追加しました。") return "redirect:/task" } } |
TaskView の list メソッドが、 String として HTML を返すものになっていますので、 listメソッドには @ResponseBody を付けています。 こうすることで、返り値のStringがそのままレスポンスとして返されます。
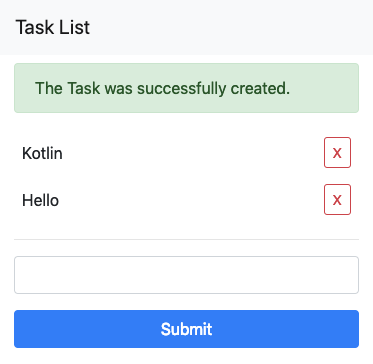
これで登録・一覧表示ができるようになりました。 ./gradlew bootrun でサーバを起動し、localhost:8080にアクセスすると下のように表示されます。

View を見やすくする
TaskView の中身を少し見やすくしてみます。 bootstrap では <div class="row">, <div class="col"> が頻出しますので、ひとつのメソッドにしておけると楽です。 そこで、Tag.kt を作成して、Viewでよく使うメソッドを記述しておきます。
|
1 2 3 4 5 6 7 |
src - main - kotlin - com.example.myapp - presentation - core - Tag.kt |
|
1 2 3 4 5 6 7 8 9 10 11 12 13 14 15 16 17 18 19 20 21 |
package com.example.myapp.presentation.core import kotlinx.html.DIV import kotlinx.html.FlowContent import kotlinx.html.div private fun FlowContent.divWithClass( defaultClass: String, classes : String? = null, block : DIV.() -> Unit = {}) { val _classes: String if (classes.isNullOrBlank()) _classes = defaultClass else _classes = classes + " " + defaultClass return div(_classes, block) } fun FlowContent.row( classes : String? = null, block : DIV.() -> Unit = {}) = divWithClass("row", classes, block) fun FlowContent.col( classes : String? = null, block : DIV.() -> Unit = {}) = divWithClass("col", classes, block) |
こちらはクラスでもオブジェクトでもなく、直接 Kotlin のファンクションが記載されたファイルです。
これを TaskView で次のようにしてインポートします。
|
1 2 |
import com.example.myapp.presentation.core.row import com.example.myapp.presentation.core.col |
すると、 div("row"), div("col") と書いていたのを row, col で簡略化して書けるようになります。 メソッドの入力になりますので、タイプミスはIDEやコンパイラが教えてくれます。


