Kotlin, Spring でアプリケーションを作ります。 Spring は昔から洗練されてきた Java のフレームワークで、大抵のことはできるようになっています。
環境
Kotlin と Spring を組み合わせるにあたり、 View には kotlinx.html を使います。 (Thymeleaf も利用可能です。) プロジェクト構成は Gradle で管理します。エディタは Intellij IDEA Community Edition を使います。
- Gradle 4.4
- Kotlin 1.2.0
- kotlinx.html 0.6.6
- Spring Boot 1.5.8
- PostgreSQL 9.5.6
- Intellij IDEA 2017.2.6 (Community Edition)
- Kotlin Plugin 1.2.0-release-IJ2017.2-1
- OpenJDK 1.8
Kotlin プラグイン のバージョンは、 Intellij IDEA のメニュー Tools -> Kotlin -> Configure kotlin Plugin Updates から確認できます。

アプリケーションの土台を作る
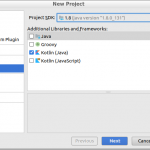
Intellij IDEA のウィザードを使ってプロジェクトを作ります。 New Project ダイアログ の左ペインから Gradle を選択し、 Kotlin (Java) にチェックを入れて Next をクリックします。 画面上に見える Multiplatform は Kotlin 1.2.0 で試験的に追加された機能で、 各種プラットフォームにクロスコンパイルするものです。 今回は使用しません。

GroupId, ArtifactId は それぞれ com.example, myapp にします。

この時点で build.gradle は次のようになっています。
|
1 2 3 4 5 6 7 8 9 10 11 12 13 14 15 16 17 18 19 20 21 22 23 24 25 26 27 28 29 30 |
group 'com.example' version '1.0-SNAPSHOT' buildscript { ext.kotlin_version = '1.2.0' repositories { mavenCentral() } dependencies { classpath "org.jetbrains.kotlin:kotlin-gradle-plugin:$kotlin_version" } } apply plugin: 'kotlin' repositories { mavenCentral() } dependencies { compile "org.jetbrains.kotlin:kotlin-stdlib-jre8:$kotlin_version" } compileKotlin { kotlinOptions.jvmTarget = "1.8" } compileTestKotlin { kotlinOptions.jvmTarget = "1.8" } |
ここで、 Gradle Wrapper がバージョン4.4になっていない場合は ./gradlew wrapper --gradle-version=4.4 を実行してバージョンを上げておきます。 Gradle Wrapper のバージョンは ./gradlew -v を実行すると確認できます。
|
1 2 3 4 5 6 7 8 9 10 11 12 13 14 |
% ./gradlew -v ------------------------------------------------------------ Gradle 4.4 ------------------------------------------------------------ Build time: 2017-12-06 09:05:06 UTC Revision: cf7821a6f79f8e2a598df21780e3ff7ce8db2b82 Groovy: 2.4.12 Ant: Apache Ant(TM) version 1.9.9 compiled on February 2 2017 JVM: 1.8.0_151 (Oracle Corporation 25.151-b12) OS: Linux 4.10.0-40-generic amd64 |
build.gradle の dependencies に compile("org.springframework.boot:spring-boot-starter-web:1.5.8.RELEASE") を追加します。
Application クラス を作り、 Spring Boot のメインメソッドを作ります。
|
1 2 3 4 5 |
src - main - kotlin - com.example.myapp - Application.kt |
|
1 2 3 4 5 6 7 8 9 10 11 12 13 14 |
package com.example.myapp import org.springframework.boot.SpringApplication import org.springframework.boot.autoconfigure.SpringBootApplication import org.springframework.boot.web.support.SpringBootServletInitializer @SpringBootApplication open class Application: SpringBootServletInitializer() { companion object { @JvmStatic fun main(args: Array<String>) { SpringApplication.run(Application::class.java, *args) } } } |
これでサーバは起動します。


